This screen can be fitted in 3 ways. For each method of fixing, we will show you:
A visualisation drawing
A how-to-measure drawing
Options to choose from the dropdown menu
A how-to-measure video
Reveal Fitted
Visualisation
How to measure
The head cassette is fitted between the reveal walls, to the side walls, using the tabs either side of the cassette or, in the case of the chain mechanism option, to the lintel using the spring clips supplied.
The two side guides fit to the underside of the head cassette and rest on the window sill. They are fitted to the inside wall of the reveal. Locking clips are fitted to the bottom of each guide to hold the screen down.
We advise taking 3 measurements for both width (top, middle & bottom) and height (left, middle & right) to allow for any variations. In each case, take the smallest measurements for your final width and height. We will make your screen to these sizes.
Options to Choose from the Dropdown Menu:
Fixing = Reveal Fit
Do you have a window sill? = Yes
Face Fitted with No Closing Channel
Visualisation
How to measure
The head cassette is fitted to the window frame using brackets fitted to the top of the cassette.
The two side guides fit to the underside of the head cassette and rest on the window sill. They are fitted directly to the window frame. Locking clips are fitted to the bottom of each guide to hold the screen down.
We advise taking 3 measurements for both width (top, middle & bottom) and height (left, middle & right) to allow for any variations. In each case, take the smallest measurements for your final width and height. We will make your screen to these sizes.
Options to Choose from the Dropdown Menu:
Fixing = Face Fit
Please note: If you have decided to fit your screen using double-sided tape, select the reveal fit option so that you do not receive the brackets to the top of your screen.
Face Fitting with Closing Channel
Visualisation
How to measure
The head cassette is fitted to the window frame using brackets fitted to the top of the cassette.
The two side guides fit to the underside of the head cassette and into a magnetic channel fitted to the window frame on the dividing bar. The magnet strip in the channel connects with a magnet strip on the underside of the mesh handle bar to hold the screen down.
We advise taking 3 measurements for both width (top, middle & bottom) and height (left, middle & right) to allow for any variations. In each case, take the smallest measurements for your final width and height. We will make your screen to these sizes.
Options to Choose from the Dropdown Menu:
Fixing = Face Fit
Please note: If you have decided to fit your screen using double-sided tape, select the reveal fit option so that you do not receive the brackets to the top of your screen.
Do you have a window sill? = No
Print this page
Thank you for purchasing a roller fly screen, we are confident that you won't be disappointed with the quality and ease of installation. Your screen will have been delivered with all return springs, bearings and brakes, if selected, ready assembled. The 2 side guides will be separate but these simply slot onto the cassette in a matter of seconds
Each roller fly screen order will come with the following components
Ready assembled cassette x 1
Side guides x 2
Screws or silicone
Cover caps if face fitting
Your screen will arrive in 3 sections, the cassette will be ready assembled and the 2 side guides will be separate, simply slide the side guides onto the end of the cassette.
FACE FITTING
This method of installation is when the roller screen is installed directly onto the window frame. To install the roller fly screens onto the face of the window frame you have 2 options, either silicone or screw fit. To screw fit the screens you will need to drill 2 holes in the side guides ensuring the screw goes between the lugs.
The screen is fixed directly to the face of the window frame.
RECESS INSTALLATION
This is when the screen is installed into the recess of the window, the screen can be set back away from the window or can be against the window frame, depending on your choice. If you were covering a large window opening with 2 openers you can set the screen back in the recess so that the screen can be operated with only one window open. If you have opted for recess installation the end caps on the cassette will have expander springs inside. Simply compress the end caps offer into the reveal and then release. The screen can then either be screwed into position or you can use silicone to secure in position.
SILICONE INSTALLATION
The first step is to make sure that the window frame is clean and free from any grease or dust.
Take the assembled screen and place it against the window to make sure that it is the correct size.
Prepare the silicone by cutting off the end and placing the nozzle onto the tube and into a silicone gun (not supplied)
Run a 10mm bead of silicone around the window frame where the fly screen will meet with frame. The tubes supplied will have enough silicone to install 2 screens.
Place the assembled screen onto the frame making sure that it joins fully with the silicone and press firmly into position. Test the operation of the screen to make sure that it travels up and down easily, make adjustments if necessary, wipe of any excess silicone from the frames. The silicone is a high grab adhesive so the screen doesn't need to be clamped in position. It is best to allow the silicone to fully dry over a 24 hour period before you use the screens. If you need to remove a screen the silicone doesn't set hard so if you run a sharp craft blade through the adhesive you will be able to remove the screen.
SAFETY
The spring retraction cassette is recommended for operation by adults as the force of the retraction could cause harm if the base bar is released before being fully retracted. DO NOT ALLOW CHILDREN TO OPERATE OR PLAY WITH THE SCREEN. Please do not allow small children to operate the screen or play with the pull cords as these are a choking hazard. These cords are best removed by simply cutting of or shortening, if there is a chance of children tampering with them. !
If your recess depth is 60mm or less or the window opens inwards, you'll be best off with an exact fitting. For recesses bigger than 60mm it's really just a matter of personal taste.
When measuring to fit inside the recess, check for anything such as tiling or picture rails that could get in the way and take them into account when measuring. We normally advise just to measure between any tiling so as to ensure a nice, snug fit.
For the best results when measuring for an exact fitting, allow your blind to overlap the edges of the recess by at least 35mm on each side. We'll then make a blind for your exact measurements and ship it with the brackets which will add an additional 3mm to the size you give us.
Additional Information:
The fabric width is 35-40mm narrower than the overall width of the blind to allow for any control component on the side of the tube (or 'cassette'). Please note that the bottom rail is 1cm wider than the fabric at either side, due to the end caps required to hold the rail in place. We always manufacture the full blind width and not fabric width. If you are fitting one of these blinds outside of a recess, you may want to consider measuring wider to allow for some fabric overlap.
We try to make the measuring and ordering process as simple as possible - so for a recess fitting, we only require the full size of your recess space and we will make small adjustments to enable the blind to fit within that space. We make a 5mm deduction to the width of this blind. If you wish to make your own allowances and do not require us to make them, please select exact fitting and not recess during the order process.
To ensure accurate measuring for bay windows, please consult our Bay Window measuring guide or for more help with measuring for blinds, or getting a perfect fit, take a look at our simple step-by-step demonstration videos in our video section.
If you are still unsure about your measurements then don't worry, just put your mind at ease and consider adding our 'MeaSUREguard' protection to your order. For just an additional 10% charge we promise to replace or alter your blinds if you find that you have made a mistake with your measuring. Available on all made to measure blinds at the checkout.
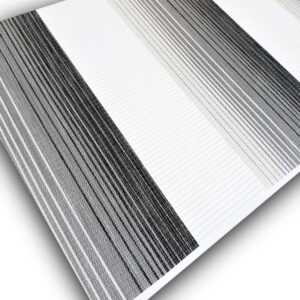
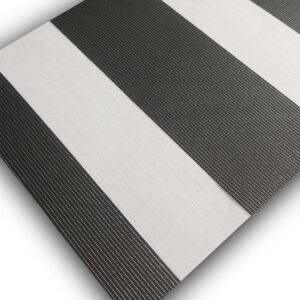
The Day and Night Roller blind, also known as a Vision blind, is a smart design that gives you style and light control within the one blind. The blind has two alternating parallels of opaque and translucent fabric. By simply adjusting the position of the blind, one can choose to align the back and front opaque and translucent layers in such a way to create a unique light filtering effect suitable for any contemporary living space. Fabric material is 100% polyester. Made of a strong, aluminium roller tube that is increased in diameter for wider blinds to ensure the blind does not bend. Supplied with an easy-fit bracket system with a spring-loaded pin end and metal brackets. Comes complete with all brackets. The brackets can be top or face fixed. Supplied with a child safety clip for peace of mind.